本文将一步一步演示如何进行布局的定制任务。也就是说,将演示如何改变Magento页面头部中顾客账户链接的布局。 移动顾客账户链接在Orange主题中,OrangeCo想要把头部链接转换成下拉菜单,Magento Luma主题中完成的方式是这样的: 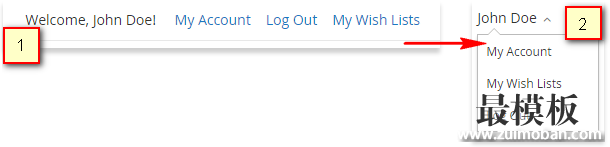 要实现该效果,需要将头部链接用一个容器包住并在列表前添加一个箭头。 默认的头部链接看起来是这样的:  需要变成这样: 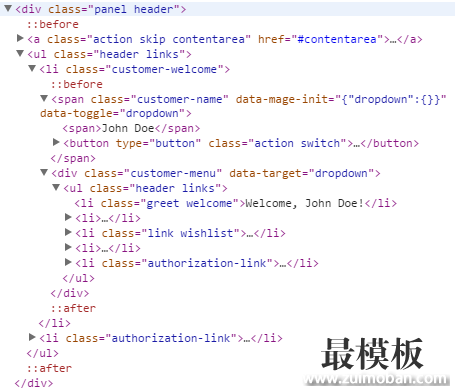 步骤1:定义块OrangeCo应用了Luma主题。使用《Magento2定位模板,布局和样式》中的方法。找到显示头部链接的块被定义在: <Magento_Customer_module_dir>/view/frontend/layout/default.xml:
...
<page xmlns:xsi="http://www.w3.org/2001/XMLSchema-instance" xsi:noNamespaceSchemaLocation="urn:magento:framework:View/Layout/etc/page_configuration.xsd">
    <body>
        <referenceBlock name="top.links">
            <block class="Magento\Customer\Block\Account\Link" name="my-account-link">
                <arguments>
                    <argument name="label" xsi:type="string" translate="true">My Account</argument>
                </arguments>
            </block>
            <block class="Magento\Customer\Block\Account\RegisterLink" name="register-link">
                <arguments>
                    <argument name="label" xsi:type="string" translate="true">Register</argument>
                </arguments>
            </block>
            <block class="Magento\Customer\Block\Account\AuthorizationLink" name="authorization-link" template="account/link/authorization.phtml"/>
        </referenceBlock>
    </body>
</page>
步骤2:定义模板与上一步定义布局的同样方法相同,OrangeCo定义用来重新排列链接的模板: <Magento_Customer_module_dir>/view/frontend/templates/account/customer.phtml
<?php if($this->customerLoggedIn()): ?>
    <li class="customer welcome customer-welcome">
        <span class="customer name" data-mage-init='{"dropdown":{}}' data-toggle="dropdown">
            <span><?php echo $this->getCustomerName(); ?></span>
            <button type="button" class="action switch"><span><?php echo __('Change')?></span></button>
        </span>
        <?php if($this->getChildHtml()):?>
        <div class="customer menu customer-menu" data-target="dropdown">
            <?php echo $this->getChildHtml();?>
        </div>
        <?php endif; ?>
    </li>
<?php endif; ?>
步骤3:扩展base布局来增加一个块OrangeCo需要在容器header.panel中新建一个名为header.links的块用来移动链接。由于链接可以在不同模型中被添加,最好是在Magento_Theme模型的页面配置default.xml中添加这个块。 所以下面的扩展布局被添加在Orange主题中: app/design/frontend/OrangeCo/orange/Magento_Theme/layout/default.xml
<page xmlns:xsi="http://www.w3.org/2001/XMLSchema-instance" xsi:noNamespaceSchemaLocation="urn:magento:framework:View/Layout/etc/page_configuration.xsd">
    <body>
        <referenceContainer name="header.panel">
            <block class="Magento\Framework\View\Element\Html\Links" name="header.links">
                <arguments>
                    <argument name="css_class" xsi:type="string">header links</argument>
                </arguments>
            </block>
        </referenceContainer>
    </body>
</page>
步骤4:移动链接要移动链接到header.links块,OrangeCo添加一个扩展布局: app/design/frontend/OrangeCo/orange/Magento_Customer/layout/default.xml
<page xmlns:xsi="http://www.w3.org/2001/XMLSchema-instance" xsi:noNamespaceSchemaLocation="urn:magento:framework:View/Layout/etc/page_configuration.xsd">
        <body>
            <referenceBlock name="header.links">
                <block class="Magento\Customer\Block\Account\Customer" name="customer" template="account/customer.phtml" before="-"/>
                <block class="Magento\Customer\Block\Account\AuthorizationLink" name="authorization-link-login" template="account/link/authorization.phtml"/>
            </referenceBlock>
            <move element="register-link" destination="header.links"/>
            <move element="top.links" destination="customer"/>
            <move element="authorization-link" destination="top.links" after="-"/>
        </body>
    </page>
现在,顾客链接看起来如下: 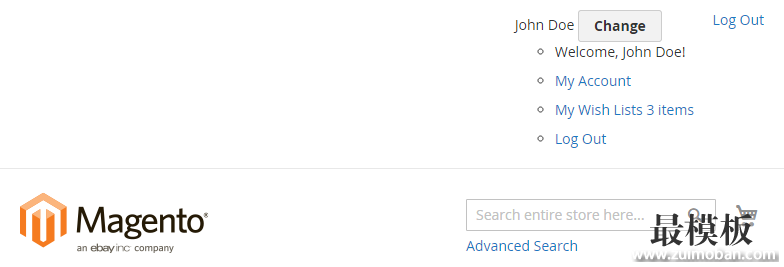 最后是添加样式:  |
Magento2定制布局示例
时间:2016-10-13 22:25来源:未知 作者:好模板 点击:次
本文将一步一步演示如何进行布局的定制任务。也就是说,将演示如何改变Magento页面头部中顾客账户链接的布局。 移动顾客账户链接 在Orange主题中,OrangeCo想要把头部链接转换成下拉
顶一下
(0)
0%
踩一下
(0)
0%
------分隔线----------------------------
- 热点内容

-
- 用自定义输入渲染器添加Magento属性
这个Magento例子将给你解释如何用自定义输入渲染添加新属性。你...
- magento 去掉index.php .html
首先应该确保你的服务器环境,达到了magento的运行需求,若你是...
- Magento系统Url地址解析方式原理
在magento中,Url地址按照http://example.com/frontName/actionControllerName/...
- linux php环境搭建以及magento安装教程
听朋友用magento在搭建电商系统,我好奇。遂自己下载了一个包部...
- magento中文语言包在线安装方法
如何安装magento中文语言包,方法是在在后台打开网站的MagentoC...
- 用自定义输入渲染器添加Magento属性
- 随机模板
-
-
 ecshop嘀嗒猫零食商城模板
人气:1037
ecshop嘀嗒猫零食商城模板
人气:1037
-
 免费大气仿爱之谷成人用
人气:12177
免费大气仿爱之谷成人用
人气:12177
-
 ecshop手表英文外贸模板
人气:1282
ecshop手表英文外贸模板
人气:1282
-
 ecshop 批量购买插件
人气:1637
ecshop 批量购买插件
人气:1637
-
 ecshop免费模板之趣玩2013最
人气:5831
ecshop免费模板之趣玩2013最
人气:5831
-
 ecshop仿唯棉模板
人气:996
ecshop仿唯棉模板
人气:996
-